[ad_1]
Let’s create a Minecraft server up and working in mins for you to revel in with shut friends.
Minecraft is a author’s paradise or a strange-looking blockified international anxious you to the core each and every time you step in.
Either means, avid gamers all over the world like it and play Minecraft in huge numbers, making it the best-selling video game of all time.
While you’ll play Minecraft solo, the revel in is going bland after you find yourself spending hours within mining and crafting.
Ergo, you might have the multiplayer to stay the joys alive. Now you’ll both sign up for the big-name servers and play in conjunction with masses if now not hundreds of gamers.
Or you’ll make a Minecraft server your self to have a laugh together with your pricey ones.
It’s necessary to know this information will create a Minecraft server on your individual PC. So you shouldn’t host gamers you don’t believe, as you’ll disclose your IP cope with.
And please bear in mind, we’ll be webhosting Minecraft Java version, which goes on Windows, macOS, and Linux.
Now that you recognize sufficient, let’s get started with the actual deal.
How to Make a Minecraft Server
Most most probably, you may be the usage of your individual PC for this. However, you’ll additionally go for Minecraft Server Hosting for extra beef up {and professional} gameplay for a huge collection of gamers.
But, we’ll keep on with the idea that you simply’re the usage of a private pc.
And since we’re putting in Minecraft Java version, we want to first set up Java or replace if you have already got it.
Installing Java on Windows is slightly easy. Visit this Java download page, and seize the most recent model.
For Ubuntu, open the terminal and input sudo apt set up openjdk-18-jre, and press input. As of this writing, Java 18 used to be the most recent; you must alter it accordingly.
If you might be to run Minecraft on a Third-party cloud server like DigitalOcean, set up java with this command as a substitute:
sudo apt set up openjdk-18-jre-headless. This indicates you’ll run Minecraft with out a graphical person interface.
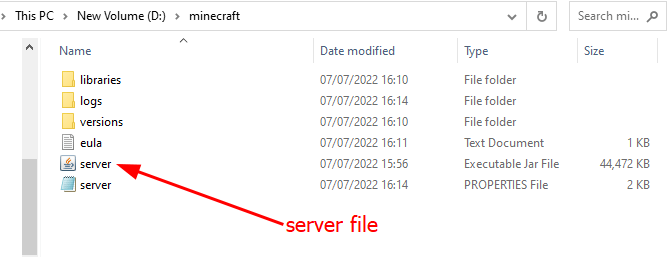
Subsequently, obtain and set up the Minecraft Java Edition Server to get a unmarried document named server. Just so you recognize, there aren’t separate recordsdata for Windows and Linux.
After downloading, it is going to be superb to create a separate folder for this for the reason that server will generate extra recordsdata that you’d need in a great tidy position as a substitute of mendacity throughout the principle obtain folder.
Next, you’ll make a choice to have a Minecraft server with or with out a graphical person interface (GUI). While having a GUI is handy, you’ll have some further sources if you select to pass through the command urged means.
Still, we’ll see each.
Minecraft Server with GUI
Using the Minecraft server with a GUI is sort of an identical in Windows and Ubuntu.
Windows
Run the server document.
This gained’t open anything else, as a substitute will create extra recordsdata, together with a textual content document for the end-user license settlement (eula.txt). Open this newsletter document, change eula=false with eula=true, and save the adjustments.

This signifies that you simply believe the developer’s phrases and prerequisites. If you omit this step, the server will close down whenever you open it.
Afterward, double-click the server document once more to open its graphical person interface. The will get started loading the entire must haves, and you are going to get a Done on the ground appropriate (simply above the empty box), indicating the server is able for webhosting.

Ubuntu
Open the terminal and use the cd command to navigate to the Minecraft folder. Alternatively, you’ll open the precise folder, right-click, and choose Open in Terminal to have it at once level against that listing.
Now run java -Xmx1024M -Xms1024M -jar server.jar, and press input.
The Xmx and Xms indicates the utmost and minimal ram your Minecraft server runs with, respectively. You can experiment with those values to get an optimum revel in.
For example, I will be able to alternate it to:
java -Xmx4096M -Xms2048M -jar server.jar
, which means that the Minecraft server will perform between 2Gb to 4Gb RAM.

This is prompting to settle for the EULA sooner than working the server. Similar to what we did in Windows, find the newly created eula.txt document, and alter it through converting false to true.
Afterward, paste and run the similar command:

This will take a little time, however you are going to quickly see a graphical person interface pop-up, indicating the server standing.
You may additionally come across some mistakes like Failed to load module “canberra-gtk-module. This may also be got rid of through putting in the precise recordsdata through opening a separate terminal and working sudo apt set up libcanberra-gtk-module libcanberra-gtk3-module.
Now restart the server, and also you gained’t get this mistake once more.
While having the GUI is superb, the usage of the terminal each and every time to open it may be anxious. So we’ll make a script to run it simply.
For this, create any textual content document within the folder and call it as get started.sh. Next, open this document with any textual content editor. Then, copy-paste the java -Xmx1024M -Xms1024M -jar server.jar, and save the adjustments.
Finally, right-click over it, input Properties on the finish of the pop up, choose Permissions on the best, and test Allow executing document as program.

Now all you might have to do is right-click the beginning.sh document, and choose Run as a program to open the Minecraft Server GUI.

So this used to be growing a Minecraft server with a GUI. Let’s take a look at the opposite.
Minecraft Server Without GUI
Arguably, that is a extra robust possibility of the 2 and makes extra sense for the ability customers.
Windows
In this system, we gained’t be working the server.jar document at once. Instead, we’ll create one get started.bat document to run the server within the command urged.
First, open the folder containing the server.jar and create a get started.txt document. Now open the document in Notepad and copy-paste the next code into the textual content document, and save the adjustments:
java -Xmx1024M -Xms1024M -jar server.jar nogui
Next, rename the document from get started.txt to get started.bat.
Now, double-click this get started.bat document to run the server the primary time. This will create a couple of recordsdata with the command urged ultimate moments after working the bat document.
Proceeding additional calls for editing the eula.txt document, equivalent to what we did within the GUI means.
Once you do this and rerun the bat document, this would be the output:

The ‘Done’ on the finish indicates the server is working completely.
Ubuntu
No GUI in Ubuntu method including a nogui within the script document that we previous made within the Ubuntu GUI means. So the brand new script can be:java -Xmx1024M -Xms1024M -jar server.jar nogui
Subsequently, save the adjustments and run the script to open the Minecraft server within the terminal:

You can sort lend a hand to get the checklist of legitimate instructions, or you’ll test the Minecraft WiKi.
Finally, we’re finished with the server advent phase.
Now to play on this newly created server, all you might have to do is use the Add Server beneath Multiplayer within the Minecraft launcher. Up subsequent, sort localhost or 0 within the Server Address and click on Done.
This will checklist the server within the multiplayer menu. Now choose the server and click on Join Server on the backside.
This will open the sport for the native participant (you). But you haven’t created this to play by myself, so let’s test how to play multiplayer on your local server.
Hosting Players on Your Minecraft Server
You can host others on to your Minecraft server in or outdoor of your native space community (LAN).
People on the similar community simply want the host’s inside IP cope with, which you’ll get through typing ipconfig within the command urged.

Ubuntu other people can sort hostname -I to get the interior IP cope with:

It’s the beginning of the end result, 192.168.1.32, on this case.
Share this with different gamers, and they may be able to sign up for your server through checklist this within the server cope with segment within the multiplayer tab.
However, Minecraft webhosting for other people outdoor the LAN will want some networking abilities for:
The first step is to configure the firewall to permit connections to a explicit port quantity that you’ll in finding on the server houses document created within the principle server folder.

So the default port quantity is 25565.
Subsequently, you want to inform the firewall to permit connections by way of this port to let your Minecraft buddies sign up for in.
Firewall Configuration
Firewall configuration is dependent on your working machine. Since this information is supposed for Windows and Ubuntu, we’ll undergo each.
Configuring Firewall on Windows
Press ⊞+R, sort firewall.cpl, and hit input.

Basically, we’ll be environment inbound & outbound laws for the port (25565) for UDP & TCP networking protocols. This can be a four-step procedure. Check this demo the place we whole step one through growing an inbound rule for TCP:
You can be repeating this for inbound (UDP) and outbound (TCP & UDP) for a similar port.
Configuring Firewall on Ubuntu
In Ubuntu, Firewall stays off through default, and you’ll test that through working sudo ufw standing verbose within the terminal.
If it returns with Status: inactive, you’ll turn on it through sudo ufw permit.
Next, sort sudo ufw permit 25565, and hit input to open port 25565, which is the default to permit connections in Minecraft.
Now we will test the open port the usage of sudo ufw standing verbose once more:

Now that we’ve got this port able for connections, it’s time to make it to be had for others. This procedure is named port forwarding, which is able to take a few seconds to a minute. But we will’t give an explanation for that right here since this is primarily based on your WiFi router.
Search to your instrument and be finished with it.
Afterward, your folks will want your public IP cope with.
You can get this through simply googling what is my ip cope with or visiting one thing like whatismyipaddress.

Blurring my public IP cope with reiterates the truth that don’t proportion yours with anyone you don’t believe.
The procedure to sign up for this server is identical to becoming a member of your individual server, the one distinction being they’ll use public IP cope with:port quantity (ex. 125.245.74.894:25565) within the Server cope with segment. And don’t trouble with the server call, it is going to routinely fetch that.
Conclusion
So that’s how you are making a Minecraft Java version server and feature your folks sign up for it.
It’s simple if the entire social gathering is on the similar LAN. This means, you simply create a server and proportion your inside IP cope with.
For gamers on other networks, it is composed of downloading and working the server document from Minecraft, configuring the firewall, port forwarding, and sharing your exterior IP cope with.
While it’s imaginable to convert your desktop PC into a little server, you want a robust one to concurrently host and play on it.
And in the event you don’t need to do that on your PC and don’t just like the controlled Minecraft servers, then now we have a very best information for webhosting Minecraft on Vultr.
[ad_2]


